Docker - Basics
Docker is a software tool (a CLI and a daemon) that can create and manage software containers.
What and Why of Containers
Containers solve the age-old problem of 'it works on my machine'. Software has become so complex with abstractions and dependencies that there are so many points of failure - wrong OS version, wrong system dependencies, wrong Python interpreter version, wrong Python library version etc.
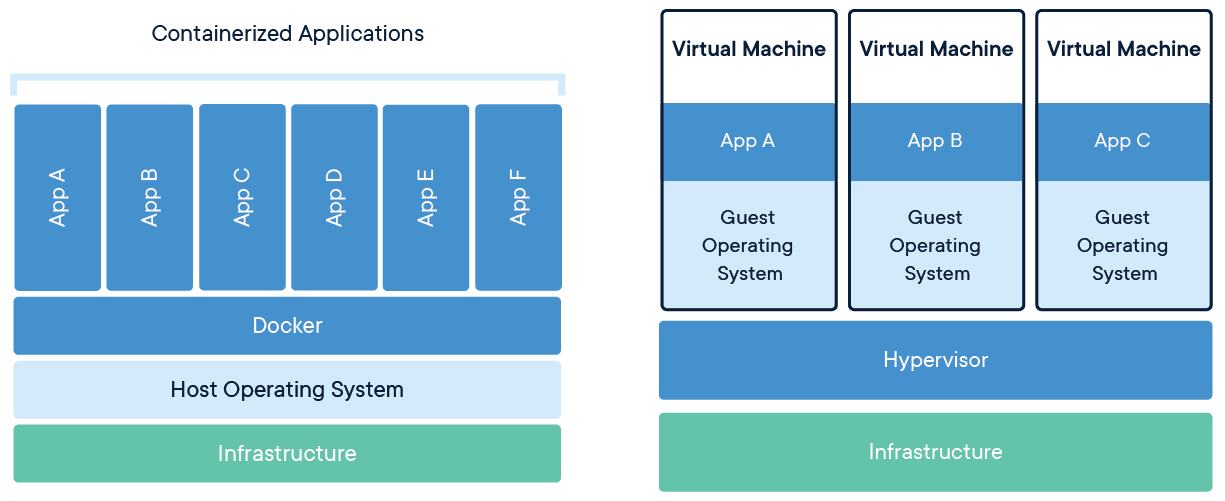
An early solution to this problem was to use a Virtual Machine (VM), which is a virtualization, or emulation of a computer system. Essentially software pretending to be physical computer hardware. The benefit of this is you can package together a consistent 'computer', with deterministic 'hardware' (virtualized), Operating System (OS) and software packages. Meaning you can run your application inside this software 'computer' and be sure that it will run the same every time, regardless of what actual physical computer the VM is installed on top of. Making the application portable.
VMs however can be very heavyweight as they contain their own OS. They can take a long time to boot up, and will consume plenty of resources from the host machine. This is where containers come in. Containers don't package anything bigger than the app and the files necessary to run it. The container runtime (Docker Engine) provides an abstraction over the host OS, so all the containers can share the same OS not and package their own. This makes a container much smaller (in the Mb vs Gb) and much quicker to start up.
Containers vs Docker
'Docker' and 'Container' are often used interchangeably. Just to clear up any ambiguity, a container is a standard unit of software that packages up code and all its dependencies so the application runs quickly and reliably from one computing environment to another. Many different tools can package these up and run them, as long as they adhere to the Open Container Initiative (OCI) which describes an open container specification. Docker happens to be the most popular tool for managing containers, but isn't the only one. Docker is actually a collection of tools - a CLI, a desktop app (Docker Desktop), and most importantly, a daemon (Docker Engine) that creates the bridge between the host OS and the running containers.
Install Docker
How to install Docker will depend on your OS. As mentioned before, there is both a Docker Desktop GUI as well as a CLI. I personally never use the GUI, and would recommend getting used to dealing with your applications through the command line.
Docker's docs to install the engine and CLI can be found here.
Docker's docs to install the desktop GUI can be found here.
Below is the shell command to install docker and its requirements on a Debian-based Linux machine.
sudo apt-get install docker-ce docker-ce-cli containerd.io docker-buildx-plugin docker-compose-plugin
Run Your First Container
Okay, now that we have Docker installed, let's run our first container using the command below in your terminal.
You may need to run each docker command with sudo at the beginning, depending on your user's privileges. E.g. sudo docker run --name mycontainer nginx
docker run --name mycontainer nginx
If it worked correctly, you should see some output like below.
...
2023/04/26 19:17:36 [notice] 1#1: start worker process 29
2023/04/26 19:17:36 [notice] 1#1: start worker process 30
2023/04/26 19:17:36 [notice] 1#1: start worker process 31
...
Great! We just ran our first container. docker run told Docker we want to run a container. We gave the running container a name using --name mycontainer so that we can identify the container later. And finally, nginx told docker that we want to run the 'nginx' container image, which docker downloaded from Dockerhub, which we will discuss on the next page.
Press Ctrl+C to exit out of the running Docker process, and let's delete the container with the command below so that we can recreate it with a few more features.
docker rm mycontainer
Port Forwarding
Nginx is a webserver (as well as a reverse proxy) which serves static web pages. By default it serves its web content on port 80. We can map our machine's port 8080 to port 80 inside the container using the flag -p 8080:80. We can also use the -d flag to run the container in the background to free up our terminal. Let's spin up the container again with the command below.
docker run -d -p 8080:80 --name mycontainer nginx
If that worked correctly, we can go to http://localhost:8080/ to see the running web server, coming from inside the container.
We can use the command below to list some details on our running containers.
docker ps
Exec into the Container
We can attach our terminal to a shell inside the container using the command below. docker exec allows you to execute a command inside the terminal, and the flags -it attach our shell to the shell's input/output inside the container. We give the name of the container, mycontainer that we want to execute a command in and finally give the command we want to execute, sh, opening up a shell.
docker exec -it mycontainer sh
You should see a #, meaning you're attached to the container's shell.
You can execute the ls command to see a list of files and folders inside the current directory.
ls
bin  boot  dev  docker-entrypoint.d  docker-entrypoint.sh  etc  home  lib  lib64  media  mnt  opt  proc  root  run  sbin  srv  sys  tmp  usr  var
Let's overwrite the html file that is being served by Nginx with our own content with the following command:
echo '<h1>MLOps Made Easy!!</h1>' > /usr/share/nginx/html/index.html
Now if we go back to http://localhost:8080/ we will see our new webpage (you'll need to refresh the page):

Cleanup
Type exit into the terminal to exit the container's shell, then run docker kill mycontainer to stop the container from running, and finally docker rm mycontainer to remove the container from your computer.